


Seed Compost: A Practical Guide | Tips and tricks
Table of Contents
Introduction
What is compost?
Compost is a mixture of decomposed organic matter, made from everyday waste such as vegetable peelings, dead leaves or lawn clippings. Over time, this waste is transformed thanks to the action of micro-organisms (bacteria, fungi) and small animals (insects, worms). The end result is a dark, crumbly material that is very rich in nutrients.
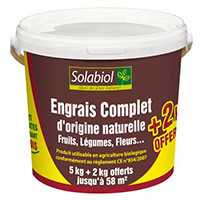
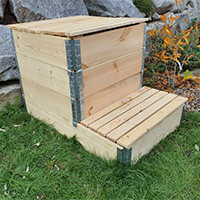
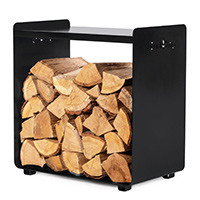
To make compost, it is important to have a suitable space where your waste will be able to decompose. This can be a simple pile in the garden or, for a cleaner and faster rendering, a dedicated composter. In our Multitanksrange, you will find several models of robust and easy-to-install composters. The composter helps maintain regular heat and protect your compost from bad weather or unwanted animals.
Why is it beneficial for seeds?
When you sow seeds, you want to give them the best possible start. However, compost acts as a real natural "booster" for your seeds. First, it improves the structure of the soil by lightening it and promoting aeration. This makes it easier for the roots of your young shoots to find the water and oxygen they need to develop properly.
Second, compost is packed with essential nutrients, such as nitrogen, phosphorus, and potassium. These nutrients are released gradually into the soil, which feeds your plants continuously. This is a valuable asset in helping your seedlings germinate quickly and grow without deficiencies.
Finally, a soil rich in compost has a better water retention capacity. This means that you will water less often, while ensuring that your seeds have the necessary water supply. In addition, a balanced substrate naturally limits the proliferation of certain diseases, as the plants are more resistant and the soil is home to a diverse microfauna.
If you're a novice, don't worry: starting a compost can only take a few simple steps. You can use a composter that is the right size for your space, for example a 300 to 600 liter model if you have a small garden. Thanks to its lid and ventilation system, it will be easier for you to manage decomposition. Not only will you get quality compost, but you will also help reduce the volume of your household waste.
In short, compost is the ideal ally for your seeds: economical, ecological and rich in nutrients. In the next chapters, we'll look at how to make it step by step, maintain it, and use it in the best way to boost the growth of your young plants.
The advantages of homemade compost
Savings and ecology
The first great advantage of homemade compost is its economic and ecological impact. Instead of buying chemical fertilisers, you create your own natural amendment from your kitchen and garden waste: peelings, coffee grounds, dead leaves... This reduces the amount of waste that goes into the trash, while turning materials that are usually considered "useless" into a high-value product for your crop.
In addition, by producing your own compost, you limit the pollution linked to the transport and manufacture of industrial fertilizers. This contributes to a more responsible lifestyle: you recycle locally, you feed the earth without the use of chemical inputs, and you preserve the biodiversity of your garden.
Composition control
By composting at home, you know exactly what you are putting in your soil. You can thus select quality organic matter (fruit and vegetable remains, untreated lawn clippings, etc.) and avoid problematic elements (fatty waste, meat, contaminated products).
This control is important: if you want compost adapted to specific seeds (lettuce, tomatoes, flowers, etc.), you can dose your "green" (rich in nitrogen) and "brown" (rich in carbon) inputs differently. For example, if your plants need lighter soil, you'll use more dry debris like dead leaves. If they require particularly nutritious soil, you will bet more on fresh peelings and clippings. This flexibility allows you to adjust your compost to the real needs of your vegetable garden or flower beds.
Improving soil structure
Finally, one of the major advantages of homemade compost lies in its ability to improve the structure of the soil. Soil enriched with compost becomes softer and better aerated, facilitating root penetration and water absorption. Young seeds find an ideal ground for germination and rapid development.
In addition, compost acts like a real natural sponge: it retains water while avoiding saturation problems. As a result, you water less, and your plants get the moisture they need for longer. At the same time, microfauna (bacteria, worms, beneficial insects) gradually settles, contributing to a living and fertile soil in the long term.
In short, producing your own compost is a wise choice to save money, preserve the environment and pamper your seeds. In the next chapter, we will see how to equip yourself and prepare your compost step by step.
Hardware and Installation
Choosing a suitable bin or composter
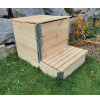
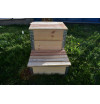
To create compost at home, there are several solutions. The simplest, if you have space, is to make a pile on the floor. However, a closed compost bin or composter makes waste management and the aesthetics of your space much easier. It also protects the compost from excessive rain and animals (rodents, cats, etc.).
- Traditional compost bins : These are usually open on top and can be made of wood or plastic. You can easily stir the compost and check its evolution. This type of container is ideal if you have a medium-sized garden and want to keep quick access to your pile.
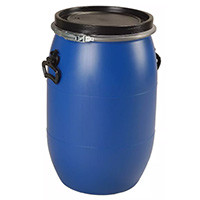
- Closed composters: More compact, they have a lid and often adjustable ventilation hatches. They accelerate decomposition by better retaining heat and moisture. On Multitanksyou will find models of different capacities , suitable for both small gardens and larger vegetable gardens.
- Rotary composters : Very practical if you are short on space or if you want to stir your compost frequently. You simply rotate the drum to aerate it. Their capacity is often smaller, but the transformation of waste can be faster.
The choice therefore depends on the amount of waste you produce, the space available and the time you can devote to maintaining your compost.
Essential tools
To make your compost successful, you don't need expensive equipment, but a few accessories make the process much easier:
- A compost fork or aerator : Stirring your mixture regularly speeds up decomposition. It is advisable to do this every 2 to 3 weeks in order to incorporate oxygen and homogenize the temperature.
- A small rake or shovel : Practical for adding or removing materials from the bottom of the composter, as well as for stirring certain areas more finely.
- A bucket or container for collecting waste in the kitchen : Choose a container with a lid to avoid odours and insects. Then empty it regularly into your composter.
- A compost thermometer (optional): This allows you to track the internal temperature of the pile. Ideal for checking that your compost is heating properly (around 50 to 60 °C at the peak of microbial activity).
With a suitable bin or composter and these few basic tools, you are ready to start your compost. In the next chapter, we will see how to choose and alternate the materials to be composted in order to quickly obtain a rich and balanced material.
Materials to be composted
The "greens" and the "browns": basic principles
To make a balanced compost, it is essential to dose two types of materials well: the "green" (rich in nitrogen) and the "brown" (rich in carbon). The "greens" provide the moisture and nutrients needed by the microorganisms responsible for breaking down your waste. The "browns", on the other hand, improve the structure of the compost, prevent it from becoming too compact and allow air to circulate more freely.
- Examples of "greens" : fruit and vegetable peelings, coffee grounds (with paper filter), tea scraps, fresh lawn clippings, wilted flowers, weeds that have not gone to seed.
- Examples of "browns" : dead leaves, crushed branches, unprinted and torn cardboard (egg cartons, toilet paper rolls), straw, sawdust or untreated wood chips.
For quality compost, aim for a ratio of about two-thirds "brown" to one-third "green". In practice, it is not necessary to weigh every piece of waste: simply monitor the appearance and consistency of the pile. If your compost is too wet and has an unpleasant smell, add more "browns." If it's too dry or breaks down slowly, incorporate more "greens."
Waste to avoid
Not all organic waste is good to put in your compost. Some can attract pests or give off strong odours, while others can contaminate your pile or slow down decomposition.
- Meat and dairy products : these foods quickly attract flies, rodents and other pests. They can also emit bad odors during decomposition.
- Oils, fats and sauces : difficult to decompose, they can coat other materials and disrupt the oxygenation of the compost.
- Diseased or invasive plants : Risk of spreading fungi or pests throughout your compost. If you suspect a disease, throw the plant in the regular waste.
- Chemically treated waste : remains of painted or varnished wood, coal ash, pet litter that has received antiparasitic treatments.
By following this simple list of "greens" to favor and waste to ban, you will help your microorganisms to work in the best conditions. Your compost will evolve more quickly into a rich and homogeneous material, ready to receive your seeds. In the next chapter, we will see precisely how to set up and manage these different layers to obtain quality compost.
The steps involved in making compost
Preparation of the compost base
To get off to a good start, start by preparing a well-draining compost base. If you use a composter from the Multitanksrange, preferably place it on bare ground, without concrete slabs, so that earthworms and other microorganisms can access it freely. At the bottom, place a first layer of coarse materials: cut branches, twigs, straw or even torn cardboard. This layer will allow air to circulate and prevent your compost from settling too quickly.
Alternating layers
Once the base coat is installed, start stacking your waste respecting the balance between "green" (kitchen scraps, fresh clippings) and "brown" (dead leaves, untreated sawdust). Aim for a ratio of two-thirds "brown" to one-third "green". First place a few handfuls of "browns", then add a layer of "greens". Repeat in successive layers.
If you compost continuously (adding new waste regularly), make sure to always cover the fresh materials with "browns". This way, you will avoid odors and limit the arrival of insects. This alternation of layers is crucial to maintain a good humidity level and ensure a rapid and homogeneous decomposition.
Aeration and humidification
After stacking several layers, take the time to stir your compost well. Regular stirring, every 15 days to 3 weeks, introduces the necessary oxygen to the microorganisms. You can use a pitchfork, compost aerator, or just a sturdy stick to lift and mix deeply.
Also keep an eye on the humidity: the compost should stay moist like a well-wrung out sponge. If it seems too dry, water it lightly with a watering can or a jet of water in fine rain. Conversely, if it is too humid (soggy appearance, unpleasant smell), add more "brown" materials to absorb the excess moisture.
By following these simple steps – preparing the base, alternating layers and managing moisture – you have the best chance of obtaining quality compost. In the next chapter, we'll look at how to maintain your pile over time and recognize the signals that indicate it's approaching maturity.
Maintenance and maturation
Monitoring the temperature and the evolution of the compost
Good compost is not just a pile of waste, but a real ecosystem in full effervescence. The bacteria and microorganisms that transform your waste generate heat. Depending on the amount of green and brown material, the internal temperature can exceed 50 °C or even 60 °C. This is a good sign: decomposition is taking place actively.
If you have a compost thermometer, don't hesitate to check the temperature once or twice a week. When the temperature drops, it is often time to stir the pile again to aerate it and restart the process. If you don't have a thermometer, rely on the appearance and smell: healthy compost is usually warm or warm at its core, and smells like undergrowth.
Signs of maturity
After a few months (usually between 4 and 9 months, depending on the conditions), your compost will reach the maturation phase. At this point, it starts to look like a dark, crumbly potting soil, which easily falls apart between the fingers. The smell should be pleasant and "forestry".
If you still see pieces of peelings or remains of stems, it may be that the decomposition is not quite over. You can then sift your compost: the finer part is ready to use, while the coarser residues can go back into the bin for a new cycle.
Common problems and solutions
- Unpleasant smell : Compost that smells bad is often too wet or insufficiently aerated. Add brown materials (dead leaves, cardboard) to balance the humidity. Turn it more frequently to promote oxygenation.
- Excessive presence of flies or insects : Check that your green waste does not remain on the surface. Always cover them with brown waste or a thin layer of soil.
- Compost that is too dry : If the pile seems dusty and decomposes slowly, water lightly with a light rain and mix. However, make sure you don't soak it.
- Rapid temperature drop : Stir the contents to boost microbial activity. Check that you have not missed any recent "green" contributions.
By making sure to maintain a good balance, you will get a rich and stable compost that is perfect for improving the quality of your soil and nourishing your seeds. In the next chapter, we'll look at how to actually use it to boost the germination and growth of your seedlings.
Using compost to enrich your seeds
Preparing the Seedling Soil
To get vigorous seedlings, start by creating a suitable mix. The compost, rich and aerated, serves as an ideal base for the development of young roots. However, pure compost may be too concentrated for some delicate seeds. The trick is to mix it in equal parts with universal potting soil or sifted garden soil.
This combination helps maintain moisture while avoiding excess nutrients. Before sowing, remember to lightly sift the mixture to remove any debris that is still coarse (pieces of wood, unbroken eggshells, etc.). This will result in a homogeneous substrate that is well suited to small seeds.
Sowing in pots and growing trays
Once your mixture is ready, fill your pots or growing trays by gently compacting the soil, without compacting the soil too much. Seeds need an aerated substrate to germinate quickly.
- Sow at the right depth : As a general rule, the seed is covered with a layer of soil equivalent to twice its size. For the finer seeds, sometimes it is enough to sprinkle them on the surface and then spray a little water.
- Controlled watering : Watering too intensively can drown the seeds and promote mold. Use a sprayer or a fine head watering can. The compost in the mixture will help retain water, preventing it from drying out too quickly.
- Temperature and light : Place your pots in a bright, temperate place (18 to 22 °C for most vegetables and flowers). The compost will gradually release its nutrients, supporting seedling germination and growth.
Transplanting into the ground
When the young shoots reach a few centimeters and have developed their first true leaves, it is time to transplant them. This step is crucial to strengthen the roots and provide sufficient space for the plants to develop properly.
- Prepare the soil : Before transplanting, loosen the soil in your vegetable garden or planters. Add a layer of mature compost to the surface and mix it lightly with the top few inches of soil.
- Dig up carefully : To avoid breaking the roots, use a small shovel or spoon to gently pull the seedlings out of their pots.
- Set up and water : Place plants in holes that are suitable for the size of the root balls. Fill with a soil-compost mixture, then water copiously. The compost will maintain good moisture around the roots and provide them with the necessary nutrients over time.
By following these steps, you will maximize your chances of obtaining robust seeds and healthy plants. In the next chapter, we'll look at some more tips for getting the most out of your compost, keeping an eye on the pH and conservation of this valuable material.
Additional tips and precautions
Managing the pH of compost
Most plants thrive well in slightly acidic to neutral soil (pH between 6 and 7). In general, homemade compost is in this range, which is suitable for the majority of crops. However, if you want to grow particularly sensitive plants (e.g. hydrangeas that like more acidic soils or vegetables that prefer more neutral soils), you can check the pH using test strips or a specific kit.
- Adjust if necessary : If your compost is too acidic, you can incorporate a little wood ash (untreated) or dolomite. If it is too alkaline, add more acidic materials such as pine needles or oak leaves. Keep in mind, however, that slight deviations in pH are often naturally compensated for by the microbial life in the soil.
Harvesting and storing your compost
When your compost is mature (dark look, smell of forest soil, crumbly texture), it can be harvested and stored for later use.
- Proceed by sifting : Strain it through a sieve if necessary to separate the elements that are still coarse (shells, sticks). These can return to the composter for an additional cycle.
- Storage : If you don't use your compost right away, store it in a ventilated container or burlap bag. Avoid airtight plastic bags that block oxygen and can promote the appearance of mold. Place it in a cool, rain-sheltered place, such as a garage or garden shed.
- Monitoring : Check the humidity from time to time. The compost should not become too dry or soggy. Light watering can be helpful if it dries out over time.
Respecting the cycles of nature
Finally, it is essential to remember that composting is a living process. In the same way that your plants follow seasons and growth rates, your compost evolves over time.
- Patience : A good compost generally takes between 4 and 9 months to mature, depending on the outside temperature and the materials used. Don't try to rush things: decomposition must happen gradually and naturally.
- Observation : Each compost pile is unique. Adjust your intake according to texture, smell and humidity level. The microorganisms and small animals present (worms, beneficial insects) are your allies in this transformation.
- Preservation of biodiversity : By letting nature do its work, you encourage local flora and fauna, which will boost the overall fertility of your garden.
By following these tips, you will preserve the quality of your compost and support your crops in the best possible way. In the conclusion, we will summarize the key steps and best practices for healthy and efficient compost in the long term.
Conclusion
Summary of the benefits of homemade compost
Composting is both an economical and ecological gesture, which recovers organic waste to make it a precious resource. You reduce your volume of bins, while producing a natural amendment, ideal for feeding your seeds and plantations. Compost lightens the soil, improves its water retention and gradually provides the nutrients that plants need to grow. It also contributes to biodiversity by hosting many beneficial microorganisms.
Reminder of good practices
To make your compost a success, make sure to:
- Alternate "greens" and "browns" : Respect a balanced ratio (about 1/3 "greens", 2/3 "browns") in order to avoid bad smells or too dry compost.
- Stir regularly : Aeration is crucial to activate decomposition. Turn your pile or composter every two to three weeks.
- Manage humidity : A compost must be "like a wrung out sponge". Too dry, it does not decompose; Too wet, it gives off bad odors.
- Be patient : Depending on the temperature and volume, it takes between 4 and 9 months to obtain a mature, dark and crumbly compost.
By following these tips, you will maximize the quality of your compost and support the good health of your crops, from seedling to harvest.
Outlook and developments
If the traditional method seems too slow, you can explore other practices:
- Vermicomposting : A special bin houses worms that considerably accelerate decomposition and produce very fine compost.
- Surface compost : Organic waste is deposited directly on the ground and decomposes on site. This technique is especially useful for beds or permanent crops.
- Bokashi compost : Thanks to specific microorganisms, your waste ferments in a closed environment and can then be incorporated into the soil.
Each of these techniques has its own advantages, but the main thing is to recycle your waste responsibly. On Multitanks, you will find a range of composters suitable for different spaces and needs. The goal is to make composting accessible to everyone, novices and experienced alike, so that everyone can enjoy a thriving garden, while protecting the planet.
In short, creating and using your own compost is a process that is both simple and rewarding. You improve the fertility of your soils, reduce your waste, and contribute to a healthier environment. Your seeds can only thank you by offering vigorous shoots and abundant harvests. Happy composting!
Share this content